Wednesday, November 16, 2011

flower power...


after one craftastic sunday and a few days in between i'm nearly finished making paper flowers for that wedding which, i'm happy to announce is my sister's!!! we've changed the color palette since i last posted since she won't be using the paper flowers for her wedding next year but is actually planning on using them for her engagement dinner, engagement photos and then eventually as decoration in her house.  super duper thanks to burrygirl aka. michelle, and to my dad for lots of help during that craftastic sunday afternoon where lisa & i thought we might eventually go mad from all of the folding and gluing and repeating...  i'm still working on the arrangement because we ended up with four coordinating cream & charcoal papers and a couple of velum papers and i want to get a nice arrangement but i love the way they're coming together.  i think we've spent about $15 on paper, gems and wire so far and could still make a couple dozen or more flowers.


i'll definitely update once they're arranged but i'm loving the way they turned out... if they weren't so complicated i'd probably make a wreath but by then i'd look like an old japanese woman (because it's origami...and it would take until i'm 80).

Sunday, October 9, 2011

lots of projects...

there's been a lot going on around here this summer... i got a new camera and have forced this girlie to sit in my yard and take lots of photos.  poor paige!


i also spent some quality time with my seester refinishing an awesome dresser turned buffet that we found at the salvation army for only $30 which is now red and... what is that above her buffet?

these awesome pinterest inspired scrabble blocks? yep, made those too, with some help from the jhubs for her birthday!  ready for a quick tutorial, it's super easy.  get a 4x4 post, cut into 1.5" thick blocks, stencil on the necessary letters with coordinating scrabble point values, add a coat of light oak stain and, voila!


they turned out so good in fact that my sister-in-law modified the original tutorial, used paint and a different stencil font, and gave them as a gift to one of her friends, they turned out amazing!


i also started making origami flowers for an upcoming wedding and am really psyched about how they've turned out as well.  following a tutorial i googled (origami paper flowers) they came together really easily thanks to some binder clips, glue & some other little clips i found


see, you make the petals individually and then wait for the glue to dry them closed (thanks to the binder clips, really, seriously, hardcore thanks!)


then you glue each of the petals to each other until you make a flower of either 5 or 6 petals and use either paper clips or some of these little clips (no idea where they came from but i'd guess walmart) to hold the sides of each petal to another petal.


they turned out super cute and after i add buttons or some sort of sparkle to the centers and wired stems i'll show you the rest, i'm really excited about how cute they are!

that's all for now, hopefully i'll have the update for you sooner rather than later!

Saturday, August 20, 2011

my sweet girlie's 12th birthday...

my lovely niece's 12th birthday is in a few days and since she couldn't decide on a cake i was going to pick up an ice cream cake... and then i saw this:


from the amazing blog Hostess With the Mostess, and i knew i'd have to make her a colorblock cake.  silly me asked her what colors she wanted (instead of just picking them) and we ended up with a more crazy and less elegant version of the beauty i was hoping for!  she picked green, purple & blue and picked crazy zebra pattern flowers from michael's in those colors to go on top... i guess a zebra/purple/blue/green theme works for a tween, right?

this cake was super duper easy... it's the first cake i've made with more than two layers that wasn't for a wedding but with the help of my trusty kitchen scale i could figure it out.  i used two cake mixes and divided each of those in half before adding the food coloring, as far as mixing the color in, i ended up using three different methods jut because the first two i tried didn't work and, sadly, the best method by far didn't involve the kitchen aid (eep!) it was actually mixing it by hand with a wisk


mixing by hand with a knife (my usual method for small batch frosting) left coloring chunks in a swirly pattern, see the purple cake layer? and the kitchen aid left chunks of color in the bottom of the bowl as you can see as flecks in the green layer but once it was all frosted with my amazing (if i do say so myself) buttercream it looked great and i don't think that anyone noticed the uneven coloring so i probably would have been fine just using the mixer for all of them


she was super excited to have a surprise waiting inside her cake


and it looked pretty cool when lifted up from inside


other than a little smearing of the frosting i think it turned out better than i had expected and just made me realize that i need to work a little bit more on leveling my cakes because the blue layer wasn't quite level enough and it was pretty noticeable... although i'm not sure than anyone really cared all that much about it being a bit uneven because they were too busy eating it!

happy birthday sweets, i hope you like your cake!

Wednesday, August 17, 2011

brenza's apartment...


 what to do when you move into your first apartment and have practically zero dollars to spend on artwork? you call your friend the designer and ask her what she can do for you... at least that's what the lovely brenza lou did (real name brenda but brenza lou just sounds better to my silly self), after seeing her super bare apartment i decided she needed some art, big art, and fast! we went through the mounds of photos on my laptop and she picked a few photos from the garden walk i took my grandmother last year.  we printed them jumbo size and framed them (thank you sam's club for the value priced poster prints and michael's for the 50% off sale for the frames)


for the one she liked the most we framed it extra large and added some metal artwork (hobby lobby 40% off!)


the only problem was finding something to go over her tv... it was a big blank white wall with nothing going on.  after finding some inspiration on blogs and of course pinterest we came up with using tissue tubes (aka toilet paper & paper towels) cut into pieces, arranged into flower shapes (see the top pic, thats the close-up) and then grouped further.... after some spray paint, some additional hot glue and a few nails the first two sections are in place, we just need to finish the center but weren't sure how big so we made the side pieces first


i'll keep you posted on the final project but here's what you get for now, are any of you working on new, pinterest or otherwise inspired art pieces?

Sunday, August 14, 2011

we're craftastic!


my seester and i saw this and this over on pinterest and knew that a crayon wreath would be amazing for the girlies' teachers as a back-to-school or christmas gift.  last week we decided that after church we'd make a final trip to the local pool and then we'd work on them...  fast forward to today, it's rainy and cool (low to mid 70s) so we're not heading to the pool.  after church, lunch and a quick snack run (we always need snacks for crafting...snacks and giant mcd's diet coke that is!)

we started with two (two girlies = two teachers) chipboard/wood wreath forms that both got quick coats of red spray paint

then i had to figure out how to attach the ribbon hangers and make a bow at the top.  after some trial and error i figured out that putting a large loop of ribbon on each wreath hanger and then tying a bow separately and threading the bow onto the closed ribbon loop would be the best solution and not have any seams showing


then we started gluing down the crayons next to each other to make the sunburst pattern... this is not a good method because things get very crooked very quickly


after jhubs so lovingly pointed out the problem (quote: 'that's super crooked and you're doing it wrong') he suggested a better method that had us place the crayons on the vertices first (picture a clock - not a digital one though) put the crayons at 12, 3, 6 & 9 first, followed by 1:30, 4:30, 7:30 & 10:30 and fill them in section by section by subdividing each section to fill in the spaces.


after figuring this out it, the whole process went very quickly, i'd say start to finish it took about 40 minutes per wreath but i didn't really time it.  i hung one inside my back door for a few pictures and played with the bow placement


sorry it's dark but i definitely like the bow a bit further down


here's the cost breakdown, not sure that ya'll need it but i like to keep track and this is the best way for me to do it:

wreath forms: $3.99 at michaels (not enough advanced planning to pick them up with coupons but we will next time!)
crayons: $1.20 for three 24 count packs of crayons at target (yay for $.40 crayons at back to school time!)
ribbon: $3.99 at michaels - 25% off coupon
total: less than $10!! which is way less than some flowers or something else and it lasts ways longer, plus i love the way it turned out and i really hope their teachers do!!


Saturday, August 6, 2011

the goings on this month

first things first, sorry, i'm a lazy blogger, i do have a really good excuse though! i's been soooo busy, really i promise... we planted a garden in early june... a really ridiculously big garden.  it's about 60'x8' but 1/2 of that depth is our grape vines so they're definitely a lot lower maintenance.  this is the garden the day jhubs and his minions finished it (thanks minions, you're amazing!), and was taken almost exactly two months ago


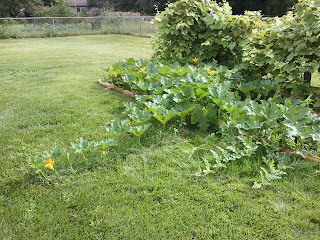
and here it is a week ago... which looks bare compared to what i wandered out to find tonight because we had a major watering last night, lots of sun today followed by a downpour tonight and it's getting a bit out of hand.  see those pumpkin vines in the way back growing out into the yard?

these pumpkin vines are taking over in a big big way... last week when i took this picture the 6 or so pumpkins that i could see were about the size of a golf ball and now, a week later, they're baseball sized and there's lots more golf ball sized ones too.  so much for having so much room in our garden we might not know what to do with all the space!


other than pumpkins we've got basil that i've dried several bunches of


pickles that ive canned 5 quarts of already and that was from only one great day of harvesting


4 english cukes, some hungarian peppers (hot and regular) that are just starting to mature, a small green pepper that i picked too early, a couple watermelons that we thought were ready but as it turns out were picked too early as well (at least we're learning!) and loads of tomatoes that better not ripen all together or i'm gonna have sauce coming out my ears!


along with all of our gardening the jhubs surprised me with a lovely early birthday present and i feel completely spoiled (thanks babe!)


i also got to head to the pool with my seester, nieces and mom on a couple of days and have helped teach the PH (youngest niece) how to swim without her lifejacket, she's also gotten up the courage to jump off of the 1 meter spring board and platform and go down the waterslide... that's a big deal for the girl that wouldn't go into the 6' deep end of the pool a few weeks ago


 oh, and i went to my 10 year high school reunion and got to wear this great dress


and these super adorable shoes!


oh! and work has been super busy and i'm working around 40 hours a week, every week, which doesn't seem like a lot but my position is supposed to be for around 25 hours a week so working the extra hours and doing everything else has been tiring.  the worst part is that everyone else has been working lots of extra hours... 

well, maybe not the worst part because keeping up morale is a big part of my manager's job and she does this by throwing quickly planned employee appreciation days (as in, pick someone working today that might not be feeling appreciated or maybe just a bit overworked and throw them a 'you're appreciated and super awesome and we love you please don't not come to work tomorrow' party).  the best part about these parties is that we get cake, or cookies, or something equally smile-inducing... usually our awesome boss gets the cake but one particular day i decided to get one kind of for our awesome boss and kind of for everyone.  i wanted to put "you're appreciated" but when i said that to the lovely bakery worker at Wal-Mart she said it might not fit, i asked her if "you're awesome" would fit and she asked me to spell 'awesome'... i should have spelled both words, serious cake fail


on the upside though, it earned lots of smiles and laughter and boosted morale right on up... so much that for a lovely lady's last day, our awesome boss decided to purposely misspell her cake as kind of a running joke


 oh lordy, they totally did misspell it and it was awesome...

we also had VBS last week at church but that's a different post for a different day, it was 5 of the most tiring and rewarding days and i wouldn't have traded it for the world :)

g'nite!

Friday, July 1, 2011

lisa's bathroom

over a year ago my seester decided that she wanted to re-do her bathroom, wanted to give it an updated spring-y color scheme and start the process for giving her whole house a good freshening up.  it started with these towels from target and a supercute penguin trashcan.  based on these towels i removed what was left of the wallpaper border, painted the bottom half of the walls that great turquoise color, got a couple of cute rugs, a lime green toothbrush holder and replaced the broken mini-blinds with light and airy white curtains, super easy makeover, right? 
easy it was, until she mentioned that she wanted some new, better storage.  dun dun duh.... (enter creepy graveyard music here).  there was plenty of room for a fun cabinet and the wheeled plastic drawer bins just weren't cutting it. there was a lot of searching, lots of custom plans designed and, it seemed, lots more cost than she planned.  any idea why someone would think it perfectly okay to charge $500 for a simple wood box that we have to put together ourselves and then change the color of  (yes, we could have left the super-expensive one white but that's just plain silly since it would almost immediately get dusty or yellowed from excess moisture and three girls all sharing a bathroom)? me neither.

thanks to our habitat re-store, lisa didn't have to fork over anywhere near that amount of cash, this beauty was available for only $65!!!! it's actual wood, was in great condition, and just ugly enough that it had been waiting several months to come to the right place so the original $90 asking price was marked down. the only downside was that we really wanted some baskets and the current door layout wasn't working... what's a girl to do?
duh! flip it over and remove a door leaving the shelves available for baskets! maybe that part was obvious to ya'll but it took me a few extra minutes to figure it out, i originally was planning on filling and re-drilling the holes so that the handles could be a single glass knob in the center of the door, guess which option was cheaper and easier!  after that it was time to sand, prime and paint the cabinet.

as you can see in the next photo the cabinet got some nice additions along with a good coat of primer.  first, a top made from spare mdf and some feet made from 4x4 blocks that we had in the scrap pile made it look a whole lot less like a kitchen cabinet and a whole lot more like an actual piece of furniture.
i primed the interior white and the outside grey, i had most of the primer and the sandpaper already so this part was pretty close to free... fyi, i thought painting bright pink over grey would be much easier than over white because i had issues with the white bleeding through the pink on the doors, turns out, it was equally as difficult but with 3 coats it turned out the same color and i'd just suggest using whatever primer u have around.
i put the shelves back in that came with the cabinet (i did pick up new shelf supports though because the previous ones were super gross) using the baskets we purchased at pier1 as a guide for spacing (they were a perfect fit by very happy coincidence) and it was looking good 

i replaced the doors and was amazed at how different it looked but then immediately started to worry that it was a little too pink (not that lisa would think it was, she could have an entirely pink room and still want more pink).
once we had it in the room with the antique trays lisa bought it was perfect.

now all we have left to do in there is get some art for the wall above the cabinet and maybe replace some light fixtures... (and maybe a better photo, that's what i get for forgetting a camera)  i hope you like it!