Showing posts with label she's so crafty. Show all posts

Saturday, July 28, 2012

take a seat...

in an effort to keep making positive changes around the exterior of our house i mentioned here, i really wanted some chairs for our front porch.  i've been lusting after these adirondack chair kits at Home Depot but they were around $50 the last time i was looking at them and, as much and i LOVE adirondack chairs and REALLY wanted them for our front porch, i couldn't stand paying that much per unfinished, some-assembly-required, chair.  much to my amazement while i was buying flowers they were marked down to $23 each... less than $50 for TWO CHAIRS!  oh, sorry for shouting :)  


so, what's a girl to do? buy the chairs and rush home to assemble them of course!  jhubs wasn't up to the perceived work since he's usually the point person for assembling everything so we waited until the next day when we got a pleasant surprise... can you tell that they look mostly assembled coming out of the box? that's right, the seat and back slats came already assembled!!!


they're remarkably easy to finish.  you attach the seat supports/front legs to one cross support and then put the seat assembly in...


then attach the back side supports to the seat assembly


attach one cross/back support to the back side supports and screw down the back rest... then attach the arms


in about 20 minutes you can have one chair and in about 35 you get 2!


it took more debate to pick out the stain since i wanted them to coordinate with our front deck but the redwood was the front-runner, it was more about picking between transparent stain and paint


stain was definitely the way to go though and they look great.  we're going to give them one more coat before they hit the porch just to make sure they're good and sealed since they were completely unfinished and we plan to leave them out for most of the year.  once they have the final coat i'll be sure to post.


on a side note, we love these chairs so much i went back and bought 4 more for our back patio.  in case you were wondering, we bought the full gallon of stain (way more than necessary for this project) so that we can re-stain all of our outdoor furniture (two benches you can see on the patio in the initial sprucing up post) and the 8-person picnic table jhubs made for one of the first july 4th parties we had.  more on that to come!

Tuesday, March 20, 2012

it's going to be a very sparkly day...

a few years from now, after the lovely brenza finishes with college, (remember when we made art for her first apartment here, you'll have to see what it looks like in her new place!) it's going to be a very sparkly day, a sparkly wedding day!!!

 (not her real dress... just the one i made her try on one day because she had been loving it)

brenza loves bling and sparkles and all sorts of pretty girly things, so of course, her wedding day needs to be the epitomy of sparkles and girly and fun, without making jay throw up glitter that is!  the plan for her wedding started way before she and  jay got engaged.  


it actually started when i showed her some ideas my sis and i had for her upcoming wedding. ideas that we, of course, compiled on and from pinterest (how did we live without it?).  you can see all of our wedding pins here.  brenza fell in love with brooch bouquets and knew she'd need one.  then we found crystal bouquets that would be great for the bridesmaids and, i'm pretty sure i may love them even more than she does and she's pretty pumped.  we knew we'd need to DIY them after seeing several on etsy that were super pricey (gorgeous...but pricey).  i read lots of tutorials but it basically came down to cutting lots of wire pieces an equal length, threading the bead/pearl/etc onto the middle of the wire and then twisting the wire ends together until it's tight.  after cutting the first few wire strands individually i realized that it was going to take f-o-r-e-v-e-r to cut each one to the same length and i needed a way to cut a bunch at once.  with some thought and a bit of the hubs smarty pants self we did this:


we put two nails into a yardstick at my desired length (23.5") and then i wound the wire around the nails, starting the wire at the midway point and wrapping around one nail and then the other in a big oval until i ran out of wire.  once i finished winding the wire off the spool i used tin snips to cut all of the wires at the halfway point separating my oval into two sections.  this not only got my wire into equal lengths (roughly equal, close enough for our purpose) it made a nice bend in the middle of the wire to help center the stones & pearls.  then i threaded the beads and did a couple of twists to secure them in the center of the wire before pulling out the big guns.

many of the tutorials suggested putting a hook into the end of a drill and then holding the wire ends with pliers while making the bead twist (if that makes sense) but i decided that i'd much rather hold the soft round bead and decided to put the wire ends into the drill.  

as for the beads, i started first at the Hobbs and then to Michaels and, between the two stores, found a nice assortment at half off.  i only picked up a couple of shapes since i didn't know exactly what would work best and these three packages were $4 total!


once we beaded several strands we realized that we wanted to get some pearls too but pearls aren't anywhere near as easy to find in abundance of size and color for a great price like the iridescent beads i found.  being the bargain hunters brenza and i are, we had already been hitting the thrift stores & second hand shops for brooches and quickly realized that there are lots of old faux pearl  necklaces out there and they're way less expensice than individual pearl beads.  the 3 strand necklace and single strand choker i found at goodwill plus a cute pair of daisy earrings were only 7 bucks and they had a lot of pearls on them.

  
we should have enough pearls with those and a choker brenza found on clearance for $5 (which included a brooch too) that we can have a good mixture in each of the bouquets, if not a really good start.  this bunch isn't perfect but it's pretty close and has 135 strands.
once we have the perfect mixture we'll wrap the base in ribbon and trim the wire ends so we don't end up getting poked on her big day!  some of the larger beads and pearls will become filler for her bouquet and we'll make boutineers of some darker teardrop beads and maybe add a few flowers in for softness. 


i'm so glad we have plenty of time to perfect these (and wire the 1000+ gems, pearls & beads), i'll keep you posted!

Wednesday, August 17, 2011

brenza's apartment...


 what to do when you move into your first apartment and have practically zero dollars to spend on artwork? you call your friend the designer and ask her what she can do for you... at least that's what the lovely brenza lou did (real name brenda but brenza lou just sounds better to my silly self), after seeing her super bare apartment i decided she needed some art, big art, and fast! we went through the mounds of photos on my laptop and she picked a few photos from the garden walk i took my grandmother last year.  we printed them jumbo size and framed them (thank you sam's club for the value priced poster prints and michael's for the 50% off sale for the frames)


for the one she liked the most we framed it extra large and added some metal artwork (hobby lobby 40% off!)


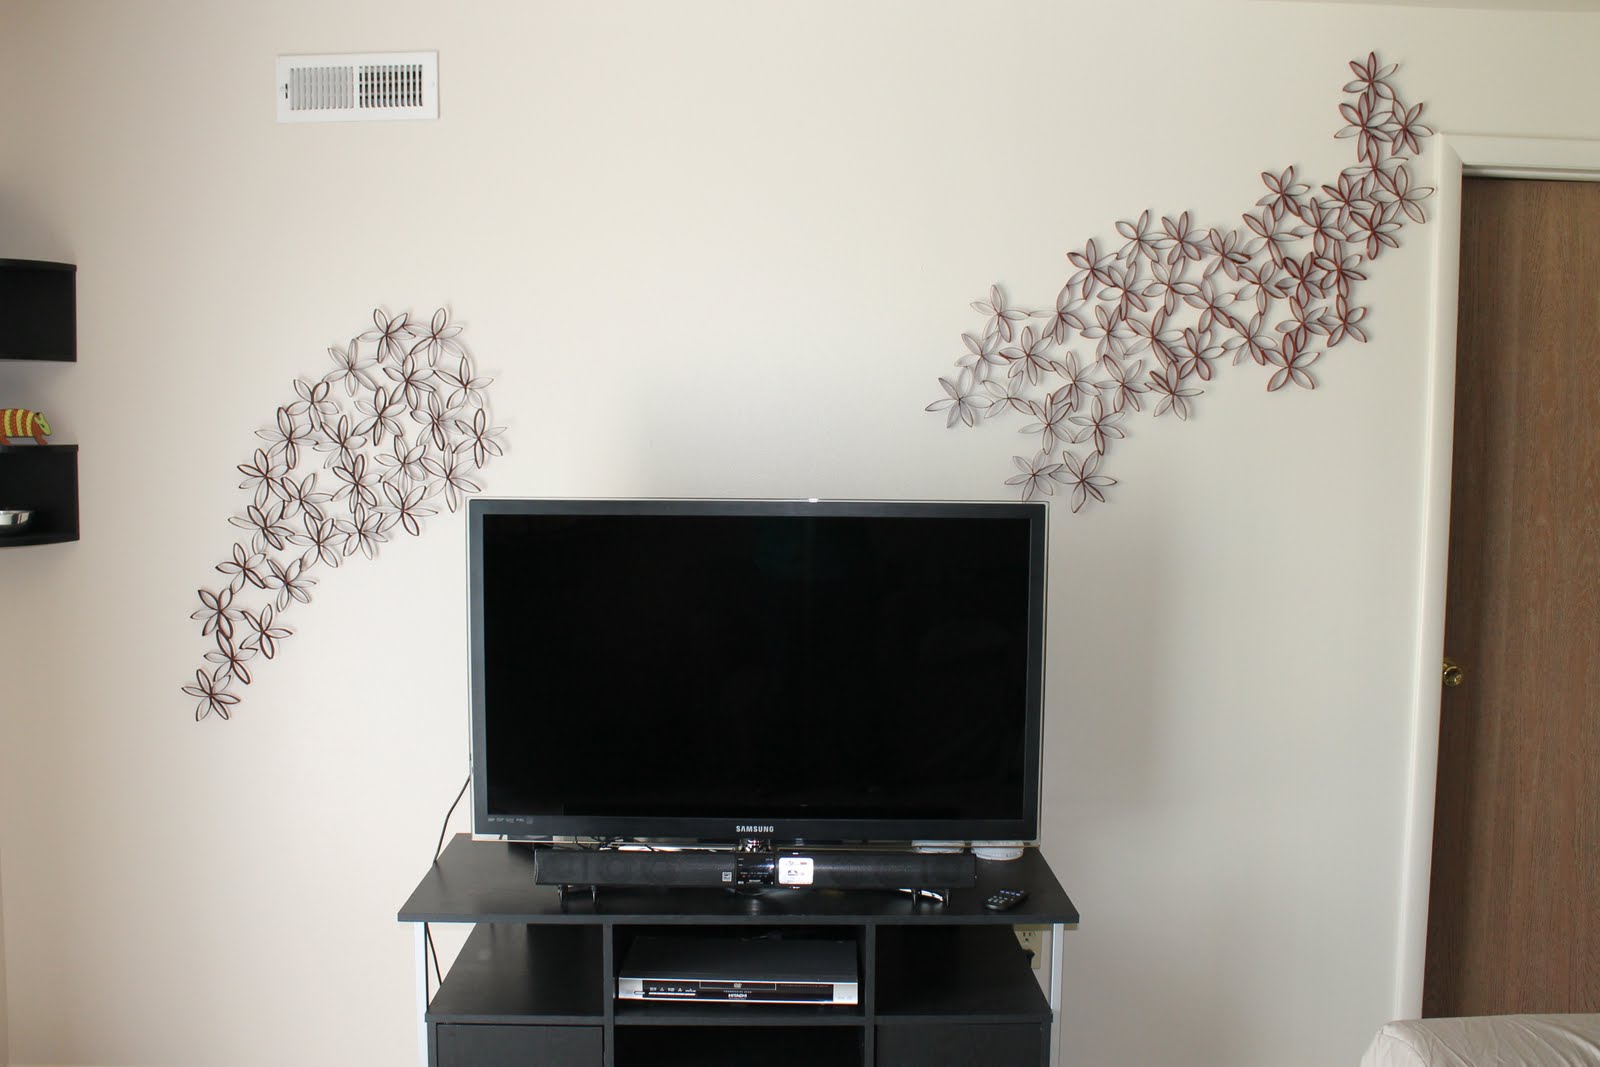
the only problem was finding something to go over her tv... it was a big blank white wall with nothing going on.  after finding some inspiration on blogs and of course pinterest we came up with using tissue tubes (aka toilet paper & paper towels) cut into pieces, arranged into flower shapes (see the top pic, thats the close-up) and then grouped further.... after some spray paint, some additional hot glue and a few nails the first two sections are in place, we just need to finish the center but weren't sure how big so we made the side pieces first


i'll keep you posted on the final project but here's what you get for now, are any of you working on new, pinterest or otherwise inspired art pieces?

Friday, July 1, 2011

lisa's bathroom

over a year ago my seester decided that she wanted to re-do her bathroom, wanted to give it an updated spring-y color scheme and start the process for giving her whole house a good freshening up.  it started with these towels from target and a supercute penguin trashcan.  based on these towels i removed what was left of the wallpaper border, painted the bottom half of the walls that great turquoise color, got a couple of cute rugs, a lime green toothbrush holder and replaced the broken mini-blinds with light and airy white curtains, super easy makeover, right? 
easy it was, until she mentioned that she wanted some new, better storage.  dun dun duh.... (enter creepy graveyard music here).  there was plenty of room for a fun cabinet and the wheeled plastic drawer bins just weren't cutting it. there was a lot of searching, lots of custom plans designed and, it seemed, lots more cost than she planned.  any idea why someone would think it perfectly okay to charge $500 for a simple wood box that we have to put together ourselves and then change the color of  (yes, we could have left the super-expensive one white but that's just plain silly since it would almost immediately get dusty or yellowed from excess moisture and three girls all sharing a bathroom)? me neither.

thanks to our habitat re-store, lisa didn't have to fork over anywhere near that amount of cash, this beauty was available for only $65!!!! it's actual wood, was in great condition, and just ugly enough that it had been waiting several months to come to the right place so the original $90 asking price was marked down. the only downside was that we really wanted some baskets and the current door layout wasn't working... what's a girl to do?
duh! flip it over and remove a door leaving the shelves available for baskets! maybe that part was obvious to ya'll but it took me a few extra minutes to figure it out, i originally was planning on filling and re-drilling the holes so that the handles could be a single glass knob in the center of the door, guess which option was cheaper and easier!  after that it was time to sand, prime and paint the cabinet.

as you can see in the next photo the cabinet got some nice additions along with a good coat of primer.  first, a top made from spare mdf and some feet made from 4x4 blocks that we had in the scrap pile made it look a whole lot less like a kitchen cabinet and a whole lot more like an actual piece of furniture.
i primed the interior white and the outside grey, i had most of the primer and the sandpaper already so this part was pretty close to free... fyi, i thought painting bright pink over grey would be much easier than over white because i had issues with the white bleeding through the pink on the doors, turns out, it was equally as difficult but with 3 coats it turned out the same color and i'd just suggest using whatever primer u have around.
i put the shelves back in that came with the cabinet (i did pick up new shelf supports though because the previous ones were super gross) using the baskets we purchased at pier1 as a guide for spacing (they were a perfect fit by very happy coincidence) and it was looking good 

i replaced the doors and was amazed at how different it looked but then immediately started to worry that it was a little too pink (not that lisa would think it was, she could have an entirely pink room and still want more pink).
once we had it in the room with the antique trays lisa bought it was perfect.

now all we have left to do in there is get some art for the wall above the cabinet and maybe replace some light fixtures... (and maybe a better photo, that's what i get for forgetting a camera)  i hope you like it!

Wednesday, June 15, 2011

paige's milk & cookies party


to help catch up on posts i missed i knew i should mention my lovely niece Paige's 6th birthday party. during the initial planning stages we were hoping to have a dual party with my other niece fiona but, unfortunately there was quite the delay in her visa paperwork and it took several months longer to get her home than originally planned. i'll tell you more on that later but for those that don't already know, she's home and fitting in quite nicely!

lisa, my sister, and i had been planning a milk & cookies themed birthday for several months and during the initial stages the only thing i knew was that we were going to have it in the fellowship hall at our church and that i wanted a smaller version of this oreo cake to be the centerpiece. i'd seen it on an episode of martha and fallen in love (how could you not!)


we also knew that we wanted several kinds of cookies and most of them would be homemade since we are ridiculously obsessed bakers when it comes to holidays, birthdays, because-you-need-baked-goods-days. then i stumbled upon this post from V and Co. (love the blog!) with these lovely cakemix cookies.


i instantly knew i had a theme and would have to work the oreos back in somehow. our fellowship hall was already decorated in lots of fun colors so all we had to do was set up some tables, balloons, trays of cookies, some smaller pre-bottled milks and call it a day.... easy as pie, er, um, cookies! easy that is, until my sister realized that a milk and cookies birthday with a stacked oreo cake meant that there wouldn't be any actual cake at the party. i had known this all along but apparently she had not processed the thought. we then brainstormed and debated (fancy word for argued) and brainstormed and came up with:

oreo cupcakes! chocolate mini cupcakes for the kiddos, one giant cupcake with her birthday candle (thanks to a large starbucks sized muffin pan my mom uses to make homemade giant muffins) and no worries about a cake-less birthday. we stuck mini oreos in the oreo buttercream and voila! the other centerpieces we discussed were cookie bouquets coming out of glass milk bottles. unfortunately at the moment i don't have the full photos to show you (i'm really bad at remembering to put a memory card in my camera so i hijacked my sister's but then forgot to download the pics before giving the card back, oops) but here you can see the cookies on a stick post-decorating.

i didn't search around a lot for a method to do these although i probably should have, i used my favorite sugar cookie recipe, laid the cookie sticks onto a baking sheet and laid the cookies on top of them as i cut them out. i barely squished the cookie around the stick because i wanted the cookies to stay fairly flat for decorating and only had a couple fall off but they fell off straight out of the oven so i re-used the stick to make more, super easy. I made royal icing according the recipe that came with my wilton meringue powder and went to town. it really was that easy. we found glass milk bottles, filled them most of the way with rice and stuck the sticks in.

the only decorations we purchased were balloons and colorful tableware. i'll probably update this more later with the photos of how everything turned out and the custom game we made for less than $10 but for now that's all i have. it was a really good day even though we couldn't share it with fiona and we're really glad we planned it inside because half way through the party it downpoured!

Sunday, December 26, 2010

as i recap i turn my thoughts to next year...

after looking back at our wonderful christmas and thinking about christmases past, i'm thinking i should make next year the year i make all (or almost all) of our gifts to other people, homemade. my seester and i are great bakers and pretty crafty so this year we made some monogrammed bags for her team and my managers and a few family members and they were very well received. maybe they were well received because they had homemade cookies, kiflis, cereal snack and chocolates in them and maybe it was just because we put time and love into them. either way they weren't that complicated (except the 21 dozen kiflis but its not like you can only make one or two dozen anyway). i know i said i'd blog a combined list of what we made, maybe more for us to have a bit of a memory of these things but if you want some ideas of what works for us in the mean time, here it is:

21 dozen kiflis (the only thing we bother to count)
macaroons
oatmeal chocolate chip cookies
cutouts
oreo truffles
buckeyes
white trash (white chocolate and peanut butter covered pretzels and cheerios)
peppermint bark
spritz cookies
peanut butter blossoms
thumbprints
brownies
chocolate crackle tops
cereal snack (modified chex mix)

the only thing i haven't made yet is the round pretzel with either a kiss or rolo smushed down by an m&m and chocolate covered peanut butter cracker sandwiches but those will get made for my new year's cocoa party. i've also made home made marshmallos for the cocoa party but i'll blog about that next week.

as for a handcrafted christmas next year i'm not thinking that i'll just bake, i'm thinking that in the coming months i should plan a craft project or two to give as gifts. since i generally shop for everyone all year long anyway, maybe crafting all year long is the way to go. i've seen a few projects that might be just right so hopefully i can keep you posted as i handcraft my christmas :)

Monday, November 22, 2010

update for paige's class...

tonight we finished the crayons for paige's kindergarten class. you can see my tutorial here or read the original from Diary of a Preppy Mom here. from 5 boxes of 64 crayons acquired at the dollar store we ended up with enough crayons so that each of the 25 students could have 4 crayons and there were 6 or 7 left over. we sorted the crayons by color so that there wouldn't be duplicates in each package and then put them in favor bags found in the dollar section at target (love the target!)


i cut pieces of carstock just a bit larger than a couple of my christmas stamps, wrote each child's name on the front under the stamp and then had paige write 'from paige' on the backs of the cards at 5 years old she's not really used to writing that much and, being in kindergarten she's still figuring out how to write in a straight line and making the letters the right direction (as you can see, the 'g' in paige is backwards but that's what makes it adorable) then we punched a hole in the card, put a ribbon through it and tied it around the bag. even though there was quite a bit of time involved, around 45 minutes per dozen including peeling wrappers, baking and cooling which had to be completed before the next batch could start, they end up pretty easy and give a lot of bang for the buck. Here's the final break down on cost (so crazy cheap)

5 boxes of 64 crayons from dollar tree - $5
one wilton silicone mini tree pan from michaels - $6 ($10-40% off with coupon)
2 bags of 20 celophane favor bags from target's dollar section -$2
ribbon left over from presents last christmas -$0
stamped gift tags from cardstock on hand - $0

grand total -$13 or just under 50 cents per kid

here are some tips and ideas in closing:
  • you could easily use the same amount of supplies but only give each child 2 crayons and give twice as many kids presents if your child has a bigger class.
  • i made a couple of crayons from only two crayons instead of 3 and they turned out a bit thinner than i wanted but still thick enough to be usable and i would imagine that your kid's crayon box/bucket/can/etc has enough broken and partial crayons that you may not have to purchase as many but i wouldn't mix brands within each tree just in case for some reason they don't reharden consistently
  • i would highly reccomend two silicone pans if you're going to be making a bigger batch but if you're doing things around the house it's pretty easy to switch them around and get it taken care of
  • make sure you have two cookie sheets so that when you take the melted crayons out of the oven you can transfer them to a different pan and put them in the fridge to lessen the cooling time
  • you could easily print some coloring pages, even resize them to 1/2 or quarter page in something easy like ms word and give them with the crayons (i think they'd be super cute with full size coloring sheets rolled into a tube (like a diploma), tied with the ribbon before it's tied around the bag of crayons, it could be a super cute stocking stuffer too
  • peeling wrappers off of cheap crayons is super easy if you loosen the whole seam of the wrapper before trying to peel the rest off
  • little bits of crayon wax flake when breaking crayons, be sure to clean your cookie sheets really weel and if you wipe it off the top of the stove before it has a chance to cool it's not messy

that's all for tonight, happy crafting!!

Wednesday, November 17, 2010

It's gonna be a crafty Christmas...

today's craft was inspired (totaly got the idea from) Diary of a Preppy Mom . after seeing her blog post about these adorable crayons i sent the link to my sister who, instead of saying 'sure, let's make some for my kids' said, 'those would be super cute for paige's class'. so, here i am at 11:30 at night taking crayons out of my oven... we started by getting 64pks of crayons at the Dollar Tree ($1 each) and a mini tree silicone mold from Michaels ($9.99- 40% coupon). Then I separated the crayons into groups of 3s that would make pretty looking crayons.then i broke the groups of 3s into each mold shapeand then you put them in the oven to 'bake' for 15-20 minutes at 250F or until they're all melty.then i put mine in the fridge because i was so impatient. After 20-30 minutes they reharden and are super easy to pop-out


as soon as they're finished and in favor bags for each kid i'll post more pics. until then, what are ya'll planning for your kiddos' classes/teachers?

Monday, November 15, 2010

i'm one crafty bennett...

here's a quick update. i've decided not to use my blog to complain or comment on the misfortune of others or anything that wouldn't inspire others, which means that FAF has come to an end and you probably won't hear about my uninspiring part-time retail job anymore. i may, at some point comment on a difficulty i'm having with a project but i promise not to whine and complain too much :) i'm thinking that i'll mainly show you (brag about) projects and tell you about fun things with the family, share pics, etc.

so, back to the title... i made these two awesome projects out of the majority of three old books (paperback books from my childhood that i have no interest in reading or saving to let my children read), two floral forms i got for $1 each and a decent amount of hot glue. the tree will look much better when grouped with many more trees all made of different materials, (i hope) i love love love this wreath and can't believe how easy it was to make. i would guess that it took around 2 hours but i'm really not sure because i did it while sitting on the sofa watching tv this afternoon.

anywho, i'm feeling craft and i'm hopingi can find a few more books to try a different technique on another wreath and maybe even find a few new tree ideas :) i'm so excited about holiday decorating (even though i'm still waiting for after thanksgiving to put up my trees)!